Arduinoちゃんペロペロ日記 第二話「実行」
タイトル、適当につけすぎている感ある。
設定
ドライバインストールを完了したら、IDEを立ち上げます。
で、まずは設定。
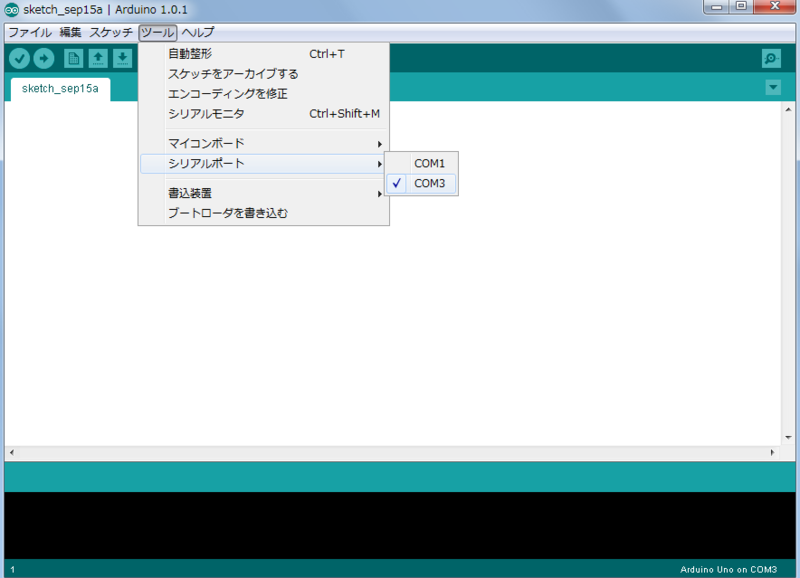
「ツール」→「マイコンボード」で使用するボードの種類を選択。

今回購入したUNOが最初から指定されており、特に変更の必要はありませんでした。
次にCOMポートの選択。

初期ではCOM1が選択されていたので変更しました。
サンプル実行
最初から簡単なサンプルが用意されているので実行します。
「ファイル」→「スケッチの例」から目的のサンプルソースを参照することが可能。

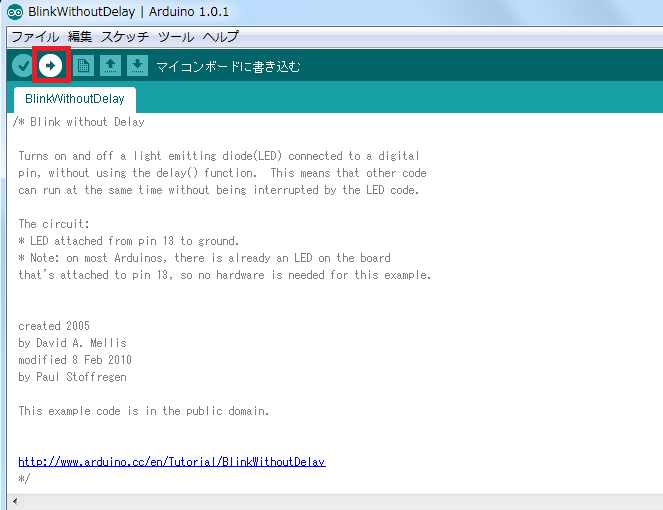
今回は基本ぽいプログラム、「BlinkWithoutDelay」を選択。
余談ですが、Arduinoではプログラムのことを「スケッチ」と呼ぶらしいです。プロトタイピングを推奨しているがゆえに生まれた表現でしょうか。よくわかんないですが。
右矢印なアイコンをクリックすると、接続中のArduinoにプログラムが転送されます。

どうもこのとき一緒にコンパイルもしているようで、適当に構文エラー発生させたら転送されませんでした(当たり前)。
BlinkWithoutDelayは、1秒置きに標準搭載のLEDをチカチカさせるだけのシンプルなプログラムです。
なんでWithoutDelayかっていうと、delay関数を利用しない手順で動いてるからだそうで。そんだけ。
delay関数はいわゆるsleep関数みたいな機能をもったものらしい。
引数に入れた整数(単位ミリ秒)だけ待たせることができるとか。
ソースじろじろ
BlinkWithoutDelayのソースを眺めてみます。
// constants won't change. Used here to
// set pin numbers:
const int ledPin =  13;      // the number of the LED pin

// Variables will change:
int ledState = LOW;             // ledState used to set the LED
long previousMillis = 0;        // will store last time LED was updated

// the follow variables is a long because the time, measured in miliseconds,
// will quickly become a bigger number than can be stored in an int.
long interval = 1000;           // interval at which to blink (milliseconds)

void setup() {
  // set the digital pin as output:
  pinMode(ledPin, OUTPUT);
}

void loop()
{
  // here is where you'd put code that needs to be running all the time.

  // check to see if it's time to blink the LED; that is, if the
  // difference between the current time and last time you blinked
  // the LED is bigger than the interval at which you want to
  // blink the LED.
  unsigned long currentMillis = millis();

  if(currentMillis - previousMillis > interval) {
    // save the last time you blinked the LED
    previousMillis = currentMillis;

    // if the LED is off turn it on and vice-versa:
    if (ledState == LOW)
      ledState = HIGH;
    else
      ledState = LOW;

    // set the LED with the ledState of the variable:
    digitalWrite(ledPin, ledState);
  }
}
経過時間が設定済みのインターバルを超えたらLED状態を変更する、っていうシンプルなプログラム。
pinModeという関数で該当ピンが入力か出力かを指定できるようで、この場合は13番ピンへの出力についてのプログラムだー、っつうことを明示してるようです。
で、digitalWriteで実際に出力させると。いうことでいいのかな。だいたいでしかわかんねえや。感覚で理解するのも危険なのでちゃんと電子回路勉強しないとな…
グローバル変数intervalの数値をいじればLEDのチカチカ間隔が変わって面白いです。まあ、それぐらいしかいじるとこがないプログラムですけど。
記述様式はCかC++っぽいですが、main関数が無いです。これは気持ち悪い。
いや、実はあるらしいです。
デフォルトで読まれるmain.cppが、最初からあります(hardware/arduino/cores/arduino/)。
内容は以下の感じ。
#include <Arduino.h>

int main(void)
{
	init();

#if defined(USBCON)
	USBDevice.attach();
#endif

	setup();

	for (;;) {
		loop();
		if (serialEventRun) serialEventRun();
	}

	return 0;
}
ああなるほど、って感じですね。
「setup()とloop()は必須の関数」という説明が参考書でされてますが、mainに書かれてんだからそりゃ必須ですわな。
setup()で適当な初期化をしてもらって、あとは無限ループでloop()を呼び続ける。シンプルな構成。
ちなみにinit()等その他の関数は別ファイルで定義済みで、特に手を加える必要は無さそうです。というか、今の段階でそこまで突っ込んで見る必要は無いでしょうな。
次回は参考書をたよりにいろいろいじってみます。